Saturday, December 26, 2015

Updates on the "Mystery" Wooden Works Clock Case

This is a follow-up post which serves to present additional research done over the past year or so on the orphaned "mystery" wooden works clock case I purchased a while back. The clock in question, as well as some initial research can be seen in this post:

http://jcclocks.blogspot.ca/2014/12/a-rare-find.html

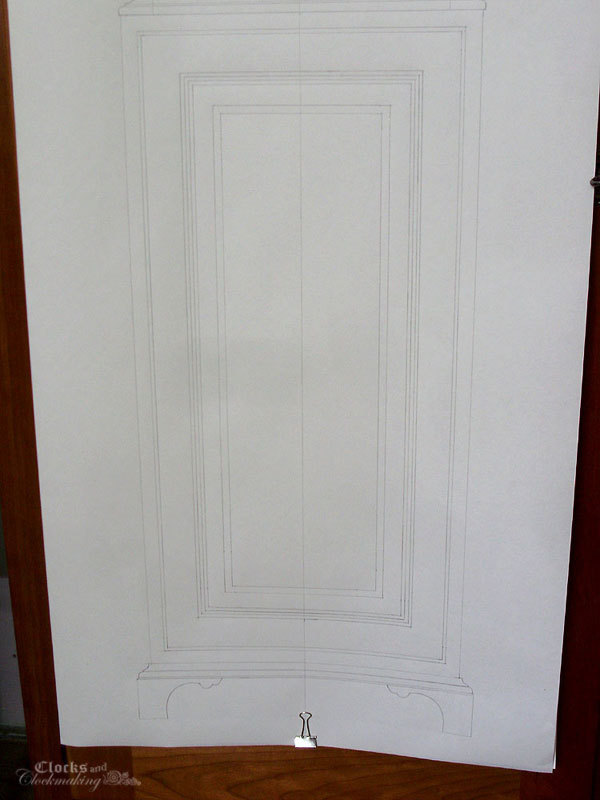
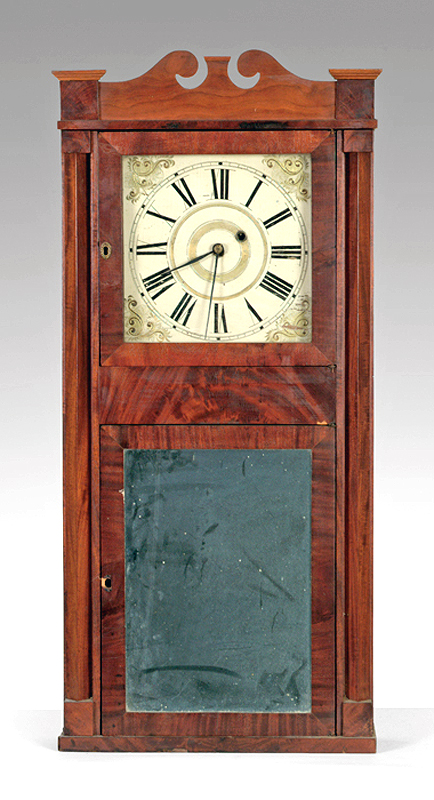
I plan to restore this old clock case, but without a matching example to copy, it becomes difficult guesswork. The following 10 clocks bear some similarities to the orphaned case, and are worth discussing for various reasons.

This first clock is a beautiful piece by Chauncey Jerome & Co., marked Richmond VA. The overall style is much fancier than my mystery case, but the door has 3 divisions (which is generally rare/unusual). The door lock is not a match.


This second clock is a very interesting and unusual clock by Case, Gilbert & Co., Winchester CT. It has a very seldom used top splat pattern, which may or may not be original to this clock, and it features a plain flat front (no columns). The similarities seem to end there, however. This clock is much taller than mine, it doesn't have a 3 piece door, and there are additional lips and square mouldings to the case. As with the previous clock, the use of a door lock is inconsistent.


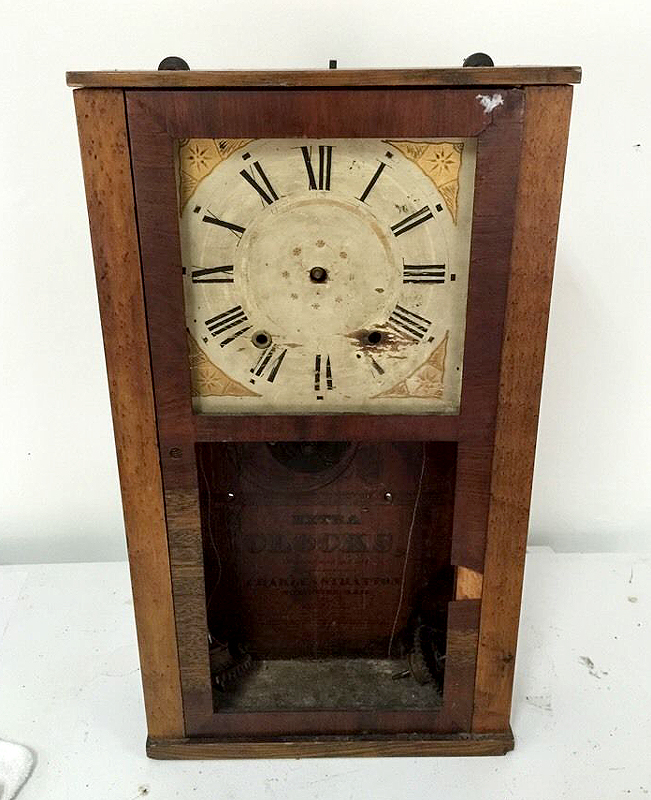
Here is another oddball. This one by Charles Stratton, and features flat fronts with bird's eye maple veneer. The size seems about right, but the interior dividers (which hold the movement in place) don't span the full height. The top is also missing, which doesn't help much with my clock. It's unclear if the door is held shut by a latch or a lock.


Rob M just posted this unusual Eli Terry Jr. & Co. clock the other day, and it caught my eye. It has a very different top, and no 3pc divided door, but it does have a plain flat front, and it uses a similar door catch.


This one is absolutely beautiful, but the only similarity is the 3pc door. Marshall & Adams, Seneca Falls, NY.


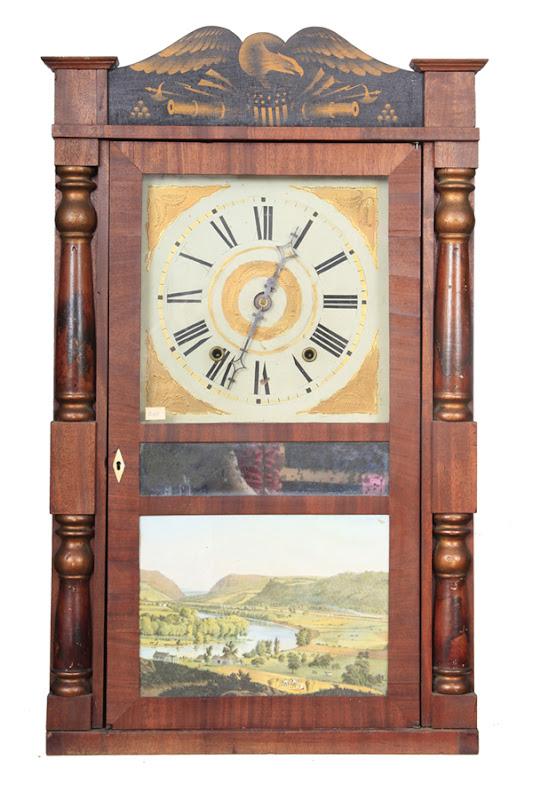
Here is another oddball, and again, only very vaguely related to the mystery clock. This is a rather rare Daniel Pratt clock. It has his often-used triangular columns, but a 2 door design with mahogany in the centre. The overall effect from a distance is similar, but the overall construction and details are very different. Sadly the top is an incorrect restoration, but it's still an interesting piece. I believe this is an 8 day clock, but I'm not 100% sure.


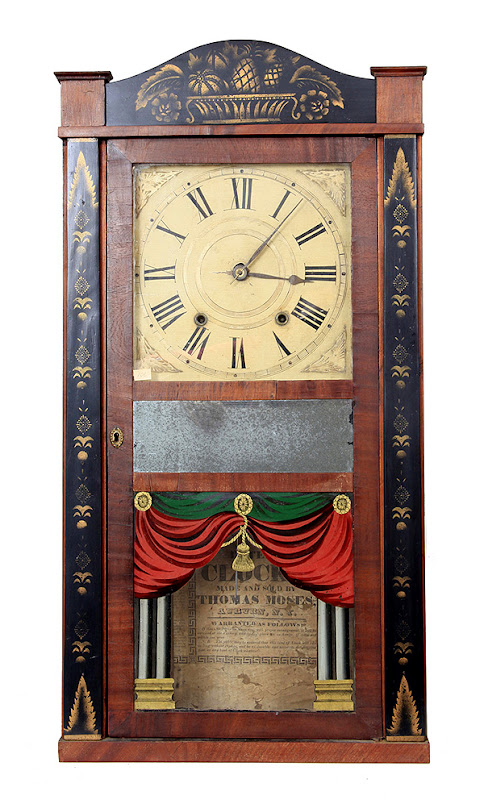
Here we find another 3pc divided door on a Thomas Moses, Auburn NY clock. This clock is unusual for its flat stenciled columns as well as for the divided door. I am generally not a big fan of the plain hump splats, but this one is correct/original.


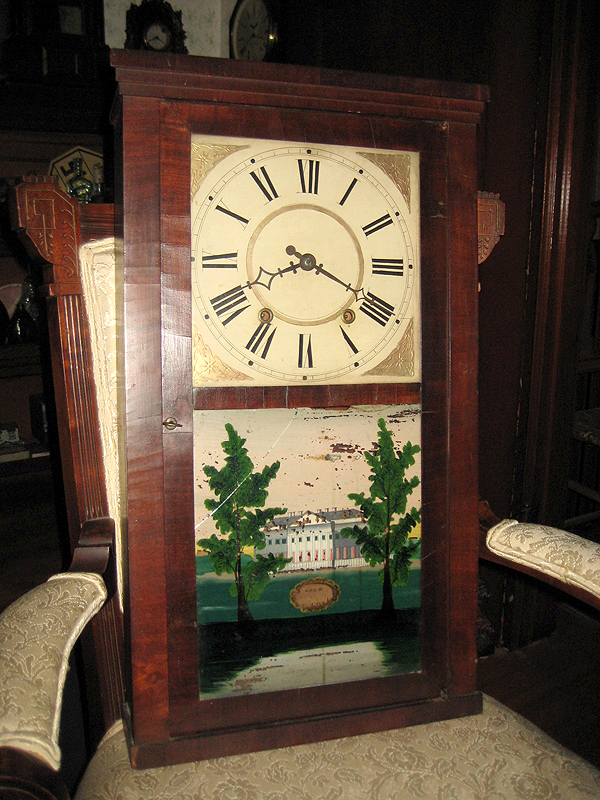
Here we have a very sad looking clock that has seen better days. It has been very poorly refinished, and the top has been badly restored with a ridiculous looking splat and finial combo. It is unclear if all the front veneers have been ripped off. It is by J.J. Beals, NY. (Boardman & Wells), and it has a plain flat front.


Another beautiful example with a 3pc door. Williams Orton & Preston & Co. Farmington.


Lastly, another ornate clock with a rare 3pc door. Also by Williams Orton & Preston & Co. Farmington.


If you have any similar clocks, either with flat undecorated fronts (no columns), or with 3pc divided doors, even better if the centre panel is mahogany, please let me know.

Tuesday, December 15, 2015

Blog Topics

I've been going through the view counts on the blog, and I've noticed a few interesting things. The most viewed posts seem to be either "new acquisition" posts, or very basic tutorials (repairing hands, wax-filling, etc). I don't really have a huge quantity of viewers on this blog yet, but I'd like to leave this post open if anyone had any special requests, or topic ideas.

As is, I plan to continue with my current trends (posting current projects as I work on them), but I do have a number of "how to" posts coming in the future.

Upcoming projects:

- Posting some of the repairs done on a rare month-going longcase clock movement with (missing) passing strike.
This will include the making of small custom parts using minimal tools.
- Finished photos of the third comtoise clock (Rossignol à Caylux).
- Dial silvering tutorial (at some point).
- Update post on the rare Seth Thomas.
- John Birge column clock restoration.
- Waterbury rosewood beehive clock restoration.
- Several ogee clock restorations.
- Tips on using a jeweler's saw.
- Clock collection video tour(s).

And lots more, including client repairs, and new acquisitions.

I also have the option to revisit past restorations I've done, including repairs to wooden works clock movements, and working on several clocks that were especially far gone.

Monday, September 28, 2015

Website

Alright, so I had a little bit of spare time this afternoon, and I spent it doing a bit of maintenance on my crappy old clock collection website:

JC's Clock Collection

The site has largely not been updated for the past...5-6 years?

I mainly just edited a bit of the text (the main text on the front page still had me saying I was 23, and I'm now 31 - almost 32), and spent all the rest of the time fixing all the broken links to photos that had been moved around in Photobucket. The site is very simple, and I like that it's free. The site is so old that it seems that the ads that are supposed to be showing on it (top, bottom, and with pop-ups) don't seem to be working anymore (at least for me, nothing shows up except 2 lines of "undefined" text where the ads used to be).

The big downside to this site, and the reason I hate updating it, is that everything I do on it is through HTML (text only) so I have to manually code everything in it by hand, and make sure there are no mistakes. Angelfire does have an easier interface to work on the pages, but I wasn't able to get things to work properly so I switched to "text only" mode. I also have to create each new page (usually by copying a template page) and make all the custom buttons and thumbnails. I would love something easier to update and customize, but I don't want to pay for a monthly service.

The ideal for me would be something more like blog form posts (like this blog) which are easy to post and edit, but I'm not sure how well that would work to browse a clock collection. I'd still like to have a basic "gallery page" with each individual clock. Maybe I could set something up where I have clickable icons linking directly to blog posts? Thoughts?

Monday, August 31, 2015

Rossignol à Caylux Comtoise - Repairs

This is a long overdue post, as this clock has been finished, and running for over a month now. It seems as though almost all of these comtoise clocks require repairs. This is the third one I buy, and all three needed repairs (some more severe than others). However, all three are now fixed and in great working order.

Repairing the Dial

I did *NOT* want to take this dial apart, because it still had the original rivets in place, but the enamel portion was loose, and there was quite a bit of rust, so I had no choice if I wanted to do a really proper repair. The two bottom tabs were also broken and I wanted to fix them.

Trying to pop the rivets out was too difficult and very risky (the enamel dials on these are EXTREMELY fragile), so I ground off the backs with a Dremel.


Now, what's extremely bizarre here, is that the enamel dial is completely loose in here. No rivets holding it in place, and no later screws. Note the position of the holes (1 and 7):


The original dial holes in the sheet metal backing plate are at 11 and 5! The arrow shows the 5 o'clock dial rivet, and the lower right brass facing rivet.


There are no holes at 1 and 7, so this dial can't be the original.


I already knew that this entire dial assembly was not original to the movement (there are 2 sets of holes in the front pillars) so one possibility is that the enamel dial is original with the movement, but the brass front and backing plate are off another clock. The reason I think that the enamel dial may be original is that so far ALL three of my comtoise clocks have different hole spacings and locations with respect to the centre. It would have been very difficult to find an exact match, since a lot of these movements were all hand made. I think the original brass front might have been crushed very badly, and this was the best repair option. It's hard to say for sure.

In either case, I decided that since the clock was unlikely to ever have a more suitable replacement as this current setup, I'd make the marriage as seamless as possible (while also not erasing all traces of it). I very carefully fitted the dial to the backing plate (with small screws), and with some careful fitting of the brass front, it looks great.

Misc Repairs

One other piece of the clock that needed attention was the pendulum's silk thread support box. This little hat shaped box is fixed onto the top of the clock, and it was missing the front cover. Luckily I know what it should look like, since it's made the same as on the Radet père comtoise.

The cover was cut from some old rusty steel strapping material, shaped (using a vise and an old nail as a forming tool).


Once it's painted it will match everything else perfectly.

While I was cleaning the wheels, I found two old inscriptions. One appears to read "Biorgues 1888":


While the other appears to read "A Wallez":


A few photos showing the cleaned-up wheels and levers:


A few other repairs included patching the large hole in the top (using JB Weld), and small odds and ends such as cutting new leather washers for the bell. I did not find an affordable set of replacement doors yet (I'm not spending 100$ on them) so I made a temporary one from thin Masonite painted black.

The last thing I need to do now is photograph my "make do" replacement pendulum, and photograph the completed clock. I will also need a proper set of weights, and new lines/hooks, etc.

Gilbert Pandia Clock Repair

Today I wanted to share some details on a recent repair project I worked on for a client. This is a rather nice Gilbert Pandia clock, made in solid walnut in 1885 (see catalogue illustration below). The clock is interesting for a few reasons. 1: it uses very unusual side turnings, which I have not seen on any other parlor clocks or gingerbread clocks in this style, and 2: it features FOUR different patents on it.

This model also appears to be somewhat rare, because I was only able to find 2 or 3 other examples of them. This is especially sad for me because the case on this clock has nearly 90% of the top missing, while everything else is still in very good shape.


The clock arrived to me looking pretty rough, and my list of repairs included the following:

- Complete clean/oil/adjust
- At least 6 bushings
- Re-leather hammer (the current tip looked like a rubber eraser)
- Replace missing pillar nut
- Replace missing broken hand on the pendulum
- Repair/rebuild broken fan fly assembly
- Replace badly damaged/patched strike wheel
- Replace/rebuild missing strike train stopwork
- Remove silver paint from dial centre
- Rebuild entire missing top, including custom carving, dentil moulding, special profiles, and turnings, strip and refinish case (case is currently painted copper, and this is visible around the dial opening)


The gong patent date is not clearly legible. Note the eraser hammer tip.


The patent fly design (one half is missing). You can also see the repaired wheel to the left, and a copper wire tie (upper right) that had been used to disable the strike train.


A soldered bushing repair on the back (this was removed, and the solder was scraped down as much as possible).


Missing nut and fly patent date:


1879 strike patent date, missing stopwork on left:


Because some of the repairs were going to be quite expensive, the owner decided go ahead with only the necessary repairs to return the clock to good working order. This included the cleaning, bushings, leather hammer repair, and the wheel replacement. The rest (for now at least) will remain as-is.

That said, I understand not wanting to spend an absolute fortune on this particular clock. The owner particularly liked the tone of the cathedral gong, and wanted to have the clock working again.

Here is the Gilbert Catalogue illustration for the Pandia model:


And here is a web image of a restored Pandia clock by Gary Jacobson (https://www.flickr.com/photos/jacobsongary/albums/72157623409503717). This gives you an idea of how complicated the missing woodwork is:


Here are the relevant patent drawings (Google Patents). The first shows the fly, patented Feb 26th 1884.


Strike lever improvement June 3rd 1879. This includes a clutch that allows the hands to be rotated backwards.


The gong patent is apparently for better resonance and sound, patented April 18th 1882.


And lastly the two patent pages showing the details of the pendulum. The pendulum is actually a sealed assembly, which makes any kind of repairs incredibly difficult. The pointer hand indicates how far up or down you have been adjusting the clock, and it moves smoothly as you operate the bottom rating nut (which stays in a fixed position). Patented Oct 30th 1883.


Most of the repairs to the movement were standard stuff, but this was my first time doing a complete wheel replacement. The old wheel repair was pretty horrific.


Here is the very unusual problem that I encountered with this wheel. While the wheel seemed to operate normally in the movement, the strike would only work for about 1/4 of the wheel, then the count hook would start to hit the count wheel teeth, missing all the deep slots, and ultimately landing on the tooth tips. Eventually the count hook would land back in the notches. No amount of adjustments made any difference, and it took me a while to figure out that there was a problem with the tooth count or the repair on the horrible wheel. When I removed the wheel to look at it more closely, I found that the wheel had 53 teeth, and it should definitely have 52 (tooth counts for wheels are rarely odd numbers). Because of the extra tooth, this made it impossible for the count wheel to advance properly. Originally the client had not wanted to have the wheel repaired (due to costs) but after I explained the problem, he told me to go ahead with the repair.

What is really odd, however, is that the wheel doesn't appear to be ovoid, and even with an impression of original teeth laid in the broken section, the tooth count is still off. The numbers shown in black don't count the two teeth bisected by the centre line.


In any case, the wheel was carefully measured, and the information was sent to my friend Jim in Texas.


This shows the wheel sections carefully taken apart:


Jim was able to provide a replacement wheel and mail it to me:


The wheel was reassembled, installed, and now everything seems to work properly again. The clock is being tested this week, and hopefully I can return it to the client next week.


I shot a short video showing the repaired clock striking correctly.

Saturday, July 25, 2015

Making Custom Inlay Banding For Clocks & Furniture

If you studied the original image of the clock I'll be reproducing, you will notice that it has a few strips of inlay banding incorporated into the design of the front. Inlay banding can be purchased from veneer suppliers, and specialty woodworking and luthier suppliers, but it's really not complicated to make your own, especially if it's composed of a simple geometric pattern.


The tools needed are a table saw, a planer, a small miter box, and various clamps and scrap glue blocks.

When making custom inlay banding, generally there are 2 styles: side grain (best) and end grain. A lot of woodworkers have a tendency to make end grain inlay simply because it seems to make more sense the way that the strips are cut and glued (like making an end grain cutting board) but once you know how side grain inlay is made, you will see that it's almost the same process, and it gives much better results (especially when it comes to staining and finishing the banding).

Here's how I make mine.


The image above shows the basic steps for a fairly complicated-looking, but ultimately quite simple banding. The banding is made up of 6 layers of thin stock (1). Three are dark (cherry, mahogany, walnut, etc), and three are light (holly, maple, satinwood, etc). The wider the strips, the more finished banding "layers" you'll be able to cut from it. I generally aim for around 1.5" wide and around 12" long. The thickness will vary depending on the pattern you want to make, but 1/16" is a common thickness for most banding.

For this alternating checkered pattern, you will need 2 separate "sandwiches": light-dark-light, and dark-light-dark. Once those are glued and dried (2), they can be cut into segments (3). The segments can vary in width, or they can all be the same. Generally the width of segments will range between 1/16" and 1/4". The segments are cut in a small mitre box which is shop made (I use the mitre box with a thin cutting Japanese saw) along with a small stop block for consistent segment widths.

Once all your segments are cut, you can just quickly take the rough sawn edges down with some sand paper. Take the time to do this step, because you want to avoid as many "glue gaps" as possible.

Gluing the segments together can be a bit tricky, but one easy method is to stick them down onto some double sided masking tape attached to the bottom gluing block. Each section is laid out beforehand so that everything can be glued fairly quickly. Try not to make your inlay strip overly long, since the glue starts to firm-up after 5 minutes or so. I aim for about 12 inches max (as stated earlier). If you only need a small section of banding for a repair, you can make it only a few inches long.

I glue each section in order, end-to-end, pressing them firmly together, and down on the tape, and then I glue the top "facing veneer" (4) down over the entire row of segments. To clarify: all the centre segments, plus top facing veneer is glued in one operation, so work quickly. Once that has been clamped and has dried for about 20-30 minutes, I'll take off the clamps, remove the bottom glue block and the tape, and I'll glue the facing veneer on the opposite side. The finished banding will then be left to dry for several hours. Once it's thoroughly dry, the banding is removed from the clamps, the excess overlapping facing veneer is trimmed off, and each edge is cleaned up either on the joiner, with a hand plane, a belt sander, or on the table saw. The finished banding can be sliced to whatever thickness you need, and used on all sorts of projects.

Note: The sample piece of inlay (5) has a doubled facing veneer (cherry, then maple). These were both glued together in one shot, following the same procedure I describe above.

There are very few limits as to how far you can tweak this technique. You can mix 1/16" thick "main strips" with layers of thin veneers, you can cut the designs into triangles, and the "Barber Pole" inlay seen in the first image at the top is nothing more than a large stack of 5 or 6 layers that is then cut on the diagonal and then glued side by side between facing veneers. You can also use much more than just 2 colours in your inlay. Often traditional inlay banding will mainly stick to 2 or 3 colours, but there are a ton of variations using very complicated designs. If you think you might be interested in making more patterns, or are looking for other ideas, there are a lot of tutorials on YouTube.

Another small note is that when you are using facing veneers, you can cheat quite a bit with the wood species. I used cherry veneer, with pale mahogany as the main "dark" wood. Since the facing veneer is so thin, it's impossible to tell that it's not the same wood.

Thursday, July 23, 2015

Massachusetts Shelf Clock Project Part 1 - Initial Planning

I have a wonderful quality movement that I built from a kit a few years ago, and I've been meaning to build a dwarf clock or a Massachusetts shelf clock (early Willard style case) case for it. For a few years (while working on other projects projects) I've been adding to my archives of clock reference photos in preparation for this clock.

After a lot of sifting through all the various photos, I decided that this was the case I liked the most:


The clock is an early 8 day timepiece by Aaron Willard, and the case measures approximately 39" tall (incl the finial) x 13.5" wide. Based on some conversations with a good friend, I felt that this was bit on the large size, so I scaled the clock down slightly to 36".

The clock was planned out and measured using Photoshop, and a grid to accurately measure all the parts of the case. This shows the fretwork.


Full size sketch:


All the patterns for the clock were traced and cut from thin cardboard.


After having traced out the case, it became very apparent that the pendulum length from my movement was not going to work well with this case design. As-is, the pendulum lands in the centre of the French feet. I would need to add about 4" to the height, and I didn't want to mess too much with the original proportions.

Because of this, I decided to trace out "Plan B" which is a clock by Reuben Tower. This clock has a MUCH longer trunk, lovely fretwork to the top, and beautiful decorative veneer work on the base. While I still find the Aaron Willard clock much more classy and stylish, I also quite like this case, and it's one of the designs I kept revisiting.


The Reuben Tower clock is 48.25" tall (incl the finial) and 12.125" wide. This is the only photo I was able to find of this particular clock.

While I like the clock as-is, I decided to shrink the trunk SLIGHTLY, and add a curved base to the bottom of the kidney dial (99% have a curved base and I don't like this flat version).

The same process was used to measure and trace the clock.


The finished clock will be quite large.


Dial is 7" diameter.


One of the advantages of this particular case design is that it features a door in the trunk. Several of the other designs (such as the Aaron Willard) have a fixed bottom panel, which simply creates an inaccessible "well" for the base of the clock. The top hood on all these clocks slides forward to access the movements.