

The tools needed are a table saw, a planer, a small miter box, and various clamps and scrap glue blocks.
When making custom inlay banding, generally there are 2 styles: side grain (best) and end grain. A lot of woodworkers have a tendency to make end grain inlay simply because it seems to make more sense the way that the strips are cut and glued (like making an end grain cutting board) but once you know how side grain inlay is made, you will see that it's almost the same process, and it gives much better results (especially when it comes to staining and finishing the banding).
Here's how I make mine.
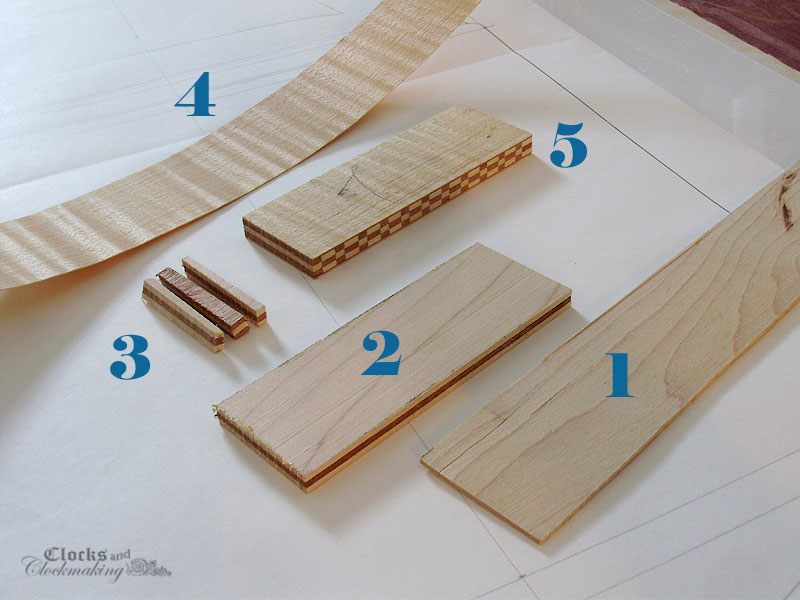
The image above shows the basic steps for a fairly complicated-looking, but ultimately quite simple banding. The banding is made up of 6 layers of thin stock (1). Three are dark (cherry, mahogany, walnut, etc), and three are light (holly, maple, satinwood, etc). The wider the strips, the more finished banding "layers" you'll be able to cut from it. I generally aim for around 1.5" wide and around 12" long. The thickness will vary depending on the pattern you want to make, but 1/16" is a common thickness for most banding.
For this alternating checkered pattern, you will need 2 separate "sandwiches": light-dark-light, and dark-light-dark. Once those are glued and dried (2), they can be cut into segments (3). The segments can vary in width, or they can all be the same. Generally the width of segments will range between 1/16" and 1/4". The segments are cut in a small mitre box which is shop made (I use the mitre box with a thin cutting Japanese saw) along with a small stop block for consistent segment widths.
Once all your segments are cut, you can just quickly take the rough sawn edges down with some sand paper. Take the time to do this step, because you want to avoid as many "glue gaps" as possible.
Gluing the segments together can be a bit tricky, but one easy method is to stick them down onto some double sided masking tape attached to the bottom gluing block. Each section is laid out beforehand so that everything can be glued fairly quickly. Try not to make your inlay strip overly long, since the glue starts to firm-up after 5 minutes or so. I aim for about 12 inches max (as stated earlier). If you only need a small section of banding for a repair, you can make it only a few inches long.
I glue each section in order, end-to-end, pressing them firmly together, and down on the tape, and then I glue the top "facing veneer" (4) down over the entire row of segments. To clarify: all the centre segments, plus top facing veneer is glued in one operation, so work quickly. Once that has been clamped and has dried for about 20-30 minutes, I'll take off the clamps, remove the bottom glue block and the tape, and I'll glue the facing veneer on the opposite side. The finished banding will then be left to dry for several hours. Once it's thoroughly dry, the banding is removed from the clamps, the excess overlapping facing veneer is trimmed off, and each edge is cleaned up either on the joiner, with a hand plane, a belt sander, or on the table saw. The finished banding can be sliced to whatever thickness you need, and used on all sorts of projects.
Note: The sample piece of inlay (5) has a doubled facing veneer (cherry, then maple). These were both glued together in one shot, following the same procedure I describe above.
There are very few limits as to how far you can tweak this technique. You can mix 1/16" thick "main strips" with layers of thin veneers, you can cut the designs into triangles, and the "Barber Pole" inlay seen in the first image at the top is nothing more than a large stack of 5 or 6 layers that is then cut on the diagonal and then glued side by side between facing veneers. You can also use much more than just 2 colours in your inlay. Often traditional inlay banding will mainly stick to 2 or 3 colours, but there are a ton of variations using very complicated designs. If you think you might be interested in making more patterns, or are looking for other ideas, there are a lot of tutorials on YouTube.
Another small note is that when you are using facing veneers, you can cheat quite a bit with the wood species. I used cherry veneer, with pale mahogany as the main "dark" wood. Since the facing veneer is so thin, it's impossible to tell that it's not the same wood.
No comments:
Post a Comment